Are you tired of having multiple user accounts cluttering up your Windows computer?
Well, you’re in luck because in this blog post, we’re going to walk you through the simple process of deleting a user account from your Windows operating system.
Whether you’re looking to free up space or simply streamline your computer’s user accounts, this guide has got you covered.
So grab a cup of coffee, sit back and relax because by the end of this post, you’ll be a pro at deleting user accounts from Windows. Let’s get started!
Prerequisites
Before we dive into the step-by-step instructions on how to delete a user account from Windows, there are a few things that you’ll need to have and know to make the process as smooth as possible.
First and foremost, you’ll need to have administrator access to the computer. Without it, you won’t be able to make any changes to the user accounts on the computer.
So, if you’re not the administrator, you may want to reach out to them to get the access you need.
Next, you’ll need to know the name of the user account that you want to delete.
This may seem like a no-brainer, but you’d be surprised at how many people start the process without knowing the exact name of the account they’re looking to delete.
So, before you begin, make sure you know the name of the account you want to delete.
Lastly, it’s always a good idea to have a backup of any important files and folders that the user account you’re deleting may have before proceeding.
This will ensure that you don’t accidentally delete something important in the process.
With all that said, let’s move on to the fun stuff – deleting user accounts! But before that make sure you have all the prerequisites.
Step-by-Step Instructions
Alright, now it’s time to get down to business and show you how to delete a user account from Windows. These step-by-step instructions will make the process a breeze, so let’s get started!
Step 1: Open the Control Panel.
This is where you’ll be making the changes to the user accounts on your computer. You can find the Control Panel by searching for it in the Start menu or by going to the Settings menu and clicking on “Control Panel.”
Step 2: Click on the “User Accounts” option.
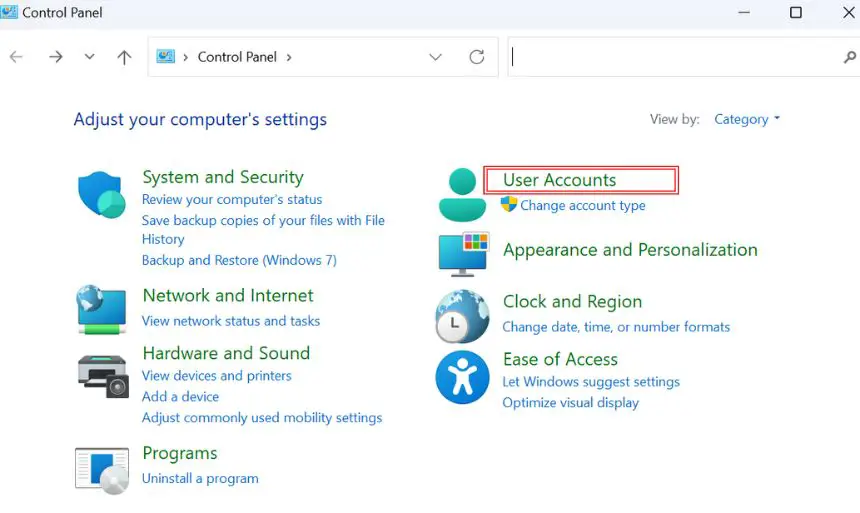
Once you’re in the Control Panel, you’ll see a list of options. Look for the one labeled “User Accounts” and click on it.
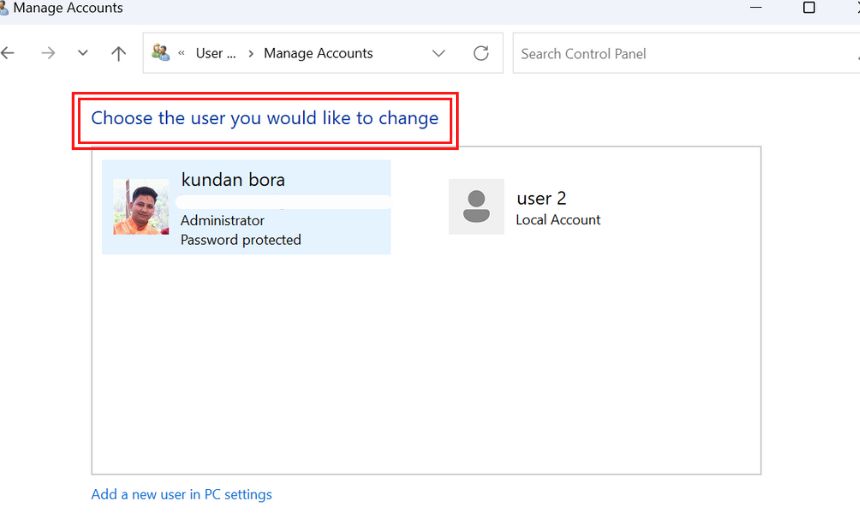
Step 3: Select the user account that you want to delete.
Now that you’re in the User Accounts section, you’ll see a list of all the user accounts on your computer. Locate the account that you want to delete and select it.
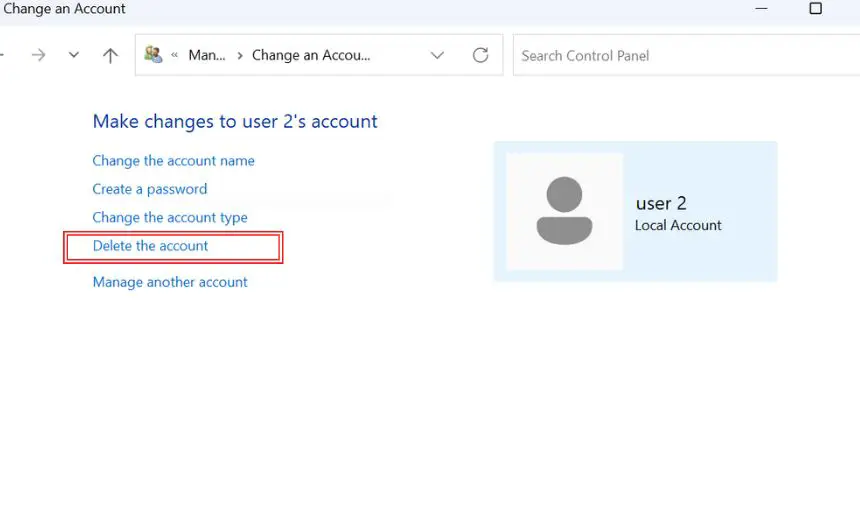
Step 4: Click on the “Delete the account” button.
Once you’ve selected the account you want to delete, you’ll see a button labeled “Delete the account.” Click on it to proceed.
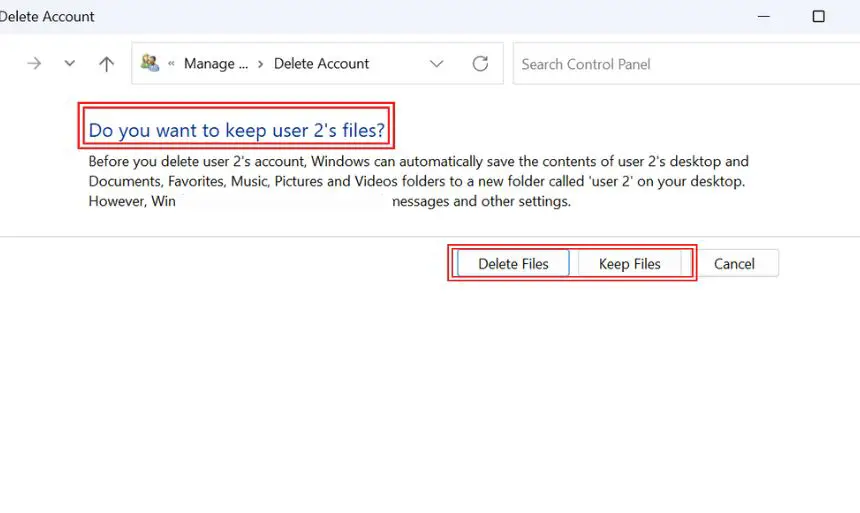
Step 5: Remove the user’s files.
If you want to remove all the files associated with the user account, you can select the option to do so before clicking on the “Delete Account” button.
Step 6: Confirm that you want to delete the account.
Windows will prompt you to confirm that you really want to delete the account. Make sure you’ve selected the correct account and click on the “Delete Account” button to proceed.

Step 7: Remove the user’s folders.
Similar to step 6, you can also remove the user’s folders if you want to.
And that’s it! You’ve successfully deleted a user account from your Windows computer. Remember to check for the files and folder of the user before deleting it.
If you have any issues or questions, feel free to reach out to me. Happy deleting!
Conclusion
And that’s a wrap folks! We’ve just walked you through the process of deleting a user account from your Windows computer.
We’ve covered everything from the prerequisites to the step-by-step instructions, and even thrown in a few tips to make the process as smooth as possible.
To recap, here’s what we covered:
- The importance of having administrator access to the computer
- Knowing the name of the user account you want to delete
- Having a backup of any important files and folders associated with the user account
- The process of deleting a user account from the Control Panel
- Optional steps to remove the user’s files and folders
As a final tip, it’s always a good idea to restart your computer after making any changes to user accounts. This will ensure that any updates are properly applied and can help prevent any potential issues.
If you have any questions or issues, feel free to reach out to me. And if you’re looking for more tips and tricks on how to optimize your Windows computer, be sure to check out my other articles. Thanks for reading!