When we talk about E-commerce and how to make money online, numerous things come to our mind.
Making your way into the field of eCommerce is a great way to enhance your career and make it successful in the world of money-making.
In this ultimate guide, you will learn the complete process of how to start a Shopify Store to sell products online.
You have to be the best before you approach to start with the guiding steps, and here we are.
However, when you speak of building a website, it sounds like a tedious job significantly to picture. With a beginner experience, it gets hectic and daunting at the same time if there is no relevance or understanding that you have in the sector.
Shopify – Everything You Need to Know!
Shopify, as an e-commerce platform, has seen an astounding response from users. It is one of the easiest platforms to manage, especially if your coding and web development world experience is minimal.
2020 is almost on its verge of ending, and what could be better than opening up your own Shopify store. Just in case you already have a Shopify store, then this complete Ultimate Shopify Store Guide will help you enhance your knowledge in the area. Additionally, you will also learn to have a functional eCommerce website to serve your customers.
Shopify is more like your home if you add a virtual perspective to it. You can sell, manage, store your own place without any hindrance. By selling products we mean, selling accessories, gadgets, watches, clothes, and even providing services to clients.
Some of the other great option to opt for Shopify includes other business-related tasks as well. Some of them are shipping, billing payment management, and managing items and services in the inventory.
Hence, all you need is a decent internet connection that will help you conduct all your transactions through the Shopify dashboard. The back-end of Shopify takes care of the whole process, which is managed through the cloud. Therefore, all kinds of maintenance and storage options are taken care of through the online process.
Why Shopify?
Shopify is a place that provides you a solution overall; basically, it is an all-in-one hub for your business and market-related queries. Shopify is the right place for you if you have your focus set on selling out your products online and not diving into its technical aspects.
Also, if you have recently set up your business, Shopify is of great convenience to you. Regardless of your knowledge in the coding world, Shopify will help you start up from the basics. However, people who know the area prefer using Shopify to follow through with fewer technicalities. This also allows these online businesses to focus more on selling and channelizing their products in the right way.
Shopify – Benefits
Some of the best and optimal reasons to go for Shopify includes the following:-
- Easy Usage – Speaking of some of the easiest to use tools, Shopify is the best with a user-friendly interface. It doesn’t matter if you are a whiz or a noob, you can get started very easily by using your Shopify store without any hassle. For users who are visiting the platform for the first time, Shopify is a great option to select and enhance their career in the business world.
- User and Language Friendly – Shopify has made its extensive reach on a global level. Regardless of which country you belong to, Shopify is accessible to everyone. Therefore, to ensure that each region extracts the best out of the platform, they have introduced multiple languages as an integration to the platform. This also gives users from every country to update and modify their facets, the content of the website, checkout stages, and so on. Additionally, users get the privilege to choose a language of their choice from the list.
- Easy to customize – As we have already stated the fact about Shopify doesn’t require a lot of technical knowledge out of you. It might so happen that the Shopify store is your first-ever and the different templates and themes on the platform help you to add a pleasant and mesmerizing thought to your front-end design.
- The Shopify expert marketplace is a great option to choose an expert for you if you don’t have the necessary time to put in. Reach out to an expert and they will help you to organize your store exactly the way you would want it to be.
Selling on Shopify – Step-by-Step Guide
Well, by now you are certain that Shopify is the place for you that will help you to convert your online dreams into a store. Now, get set ready to take charge of your brand new Shopify store and we are here to tell you how!
Step 1: Go for the Shopify Free Trial Period
Shopify offers every user a trial for 14 days. This is for all new users who are using the platform for the first time. It is ample time for a newcomer to prepare their store and launch it till the ending of the trial period.
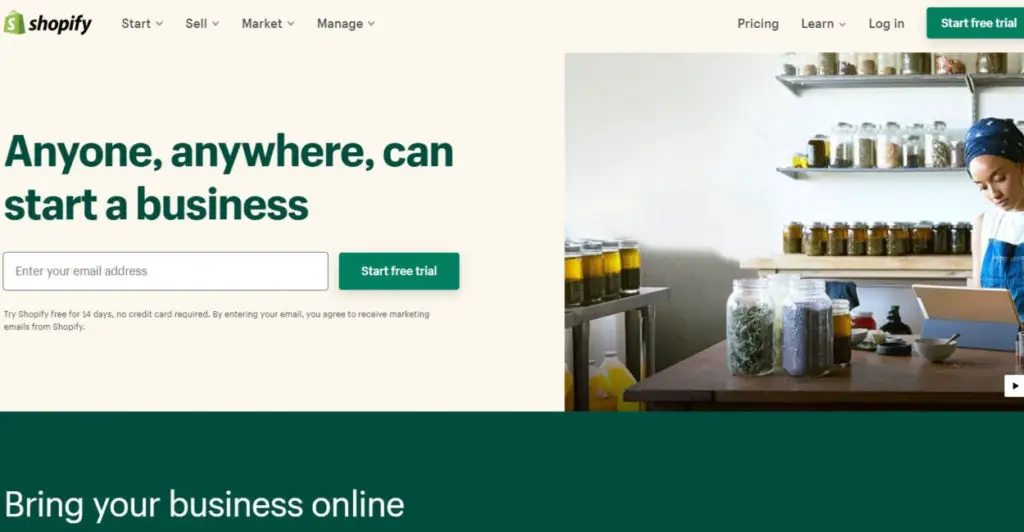
All that you require to do is browse through the website and then click directly on the “Start Free Trial” button like below.

Once you click the Free Trial button, you can start by putting in your details along with the details of your store (which should include a quirky name for your Shopify store).
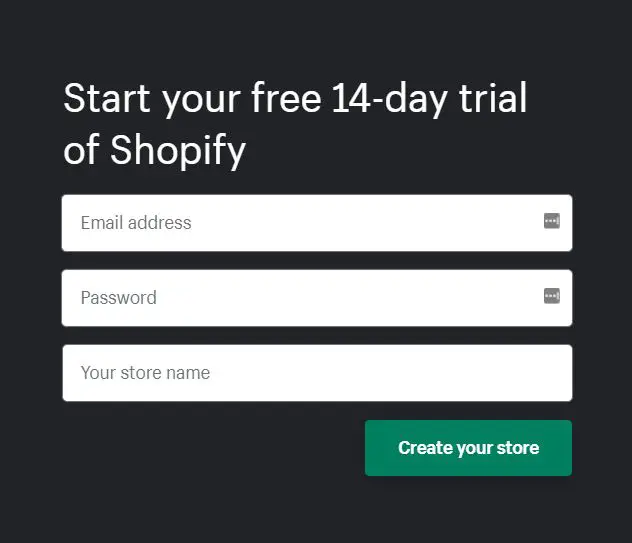
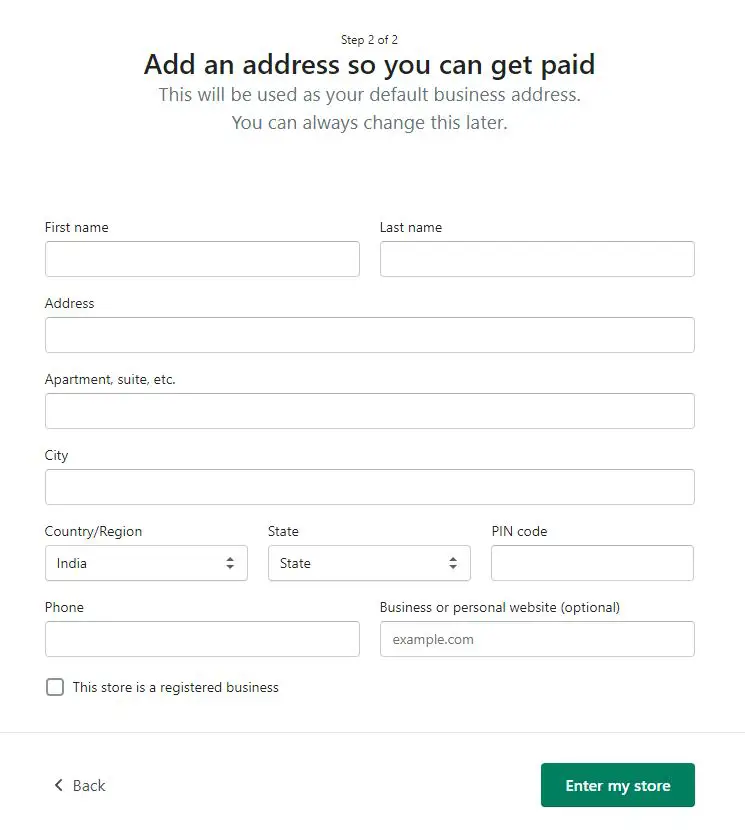
Once you are done, you can go ahead and click on ‘Create your store’ which will need some additional information about your store. Just fill the details up and you are good to go. There will be 2 steps:
Step 1:
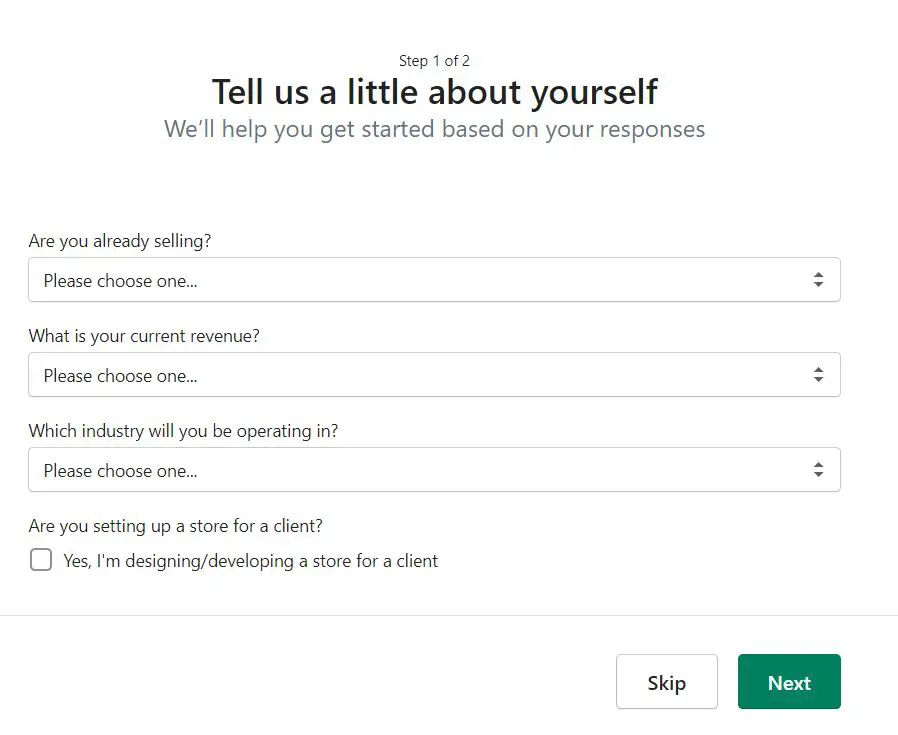
Step 2:
Furthermore, once you are done with the registration process, you will be taken to the Shopify dashboard. The dashboard is figuratively the place where you are going to spend most of the time selling and buying.
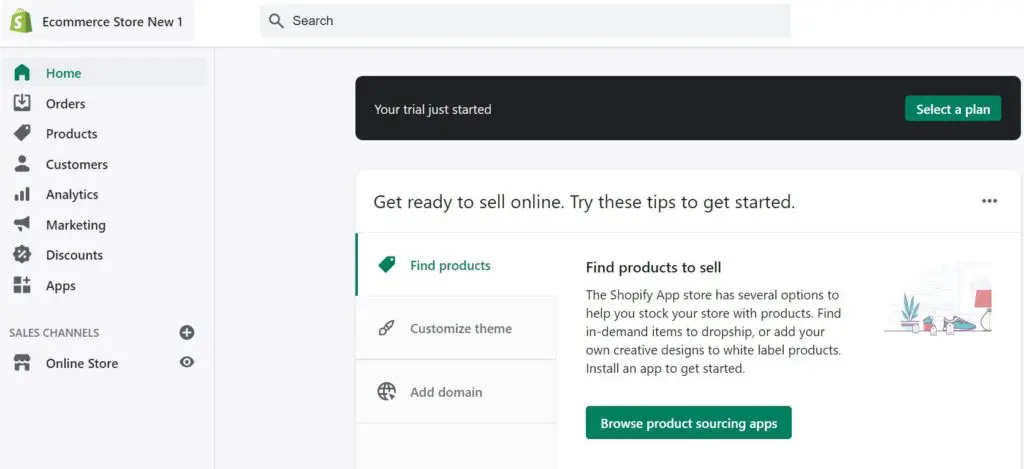
The dashboard/homepage will allow you to add products, arrange them, customize, and even add your own personal domain. If you are a beginner, adding the domain would be the first thing to consider.
Step 2: Store Settings Specific Configuration
There are multiple tabs that will need you to add details and configure them. Here you go.
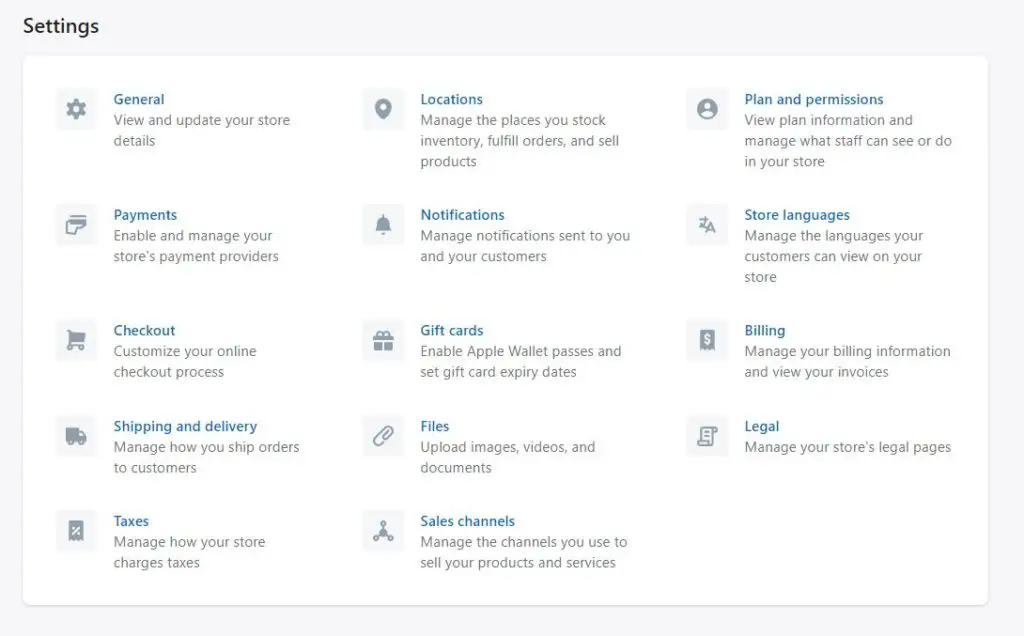
General
General Tab allows you to configure the details of your Shopify store. Its field includes store name and e-mail address.
It is the best idea to create a business email domain by using available free email providers. Getting a free email business domain makes your website authentic.
Payment Options
The next tab is Payments. This will contain all the details on how your Shopify store will accept payments for every purchase made on the website.
If you have successfully enabled the Shopify Payments, then you are good to go. You don’t have to look any further. This will save all your time and hence, would be a straightforward process to go ahead with it.
The main payment providers that you need are PayPal Express Checkout toggled with Shopify payments. Additionally, you can also enable Google Pay or Apple Pay. However, just a piece of advice, these are really not a crucial factor.
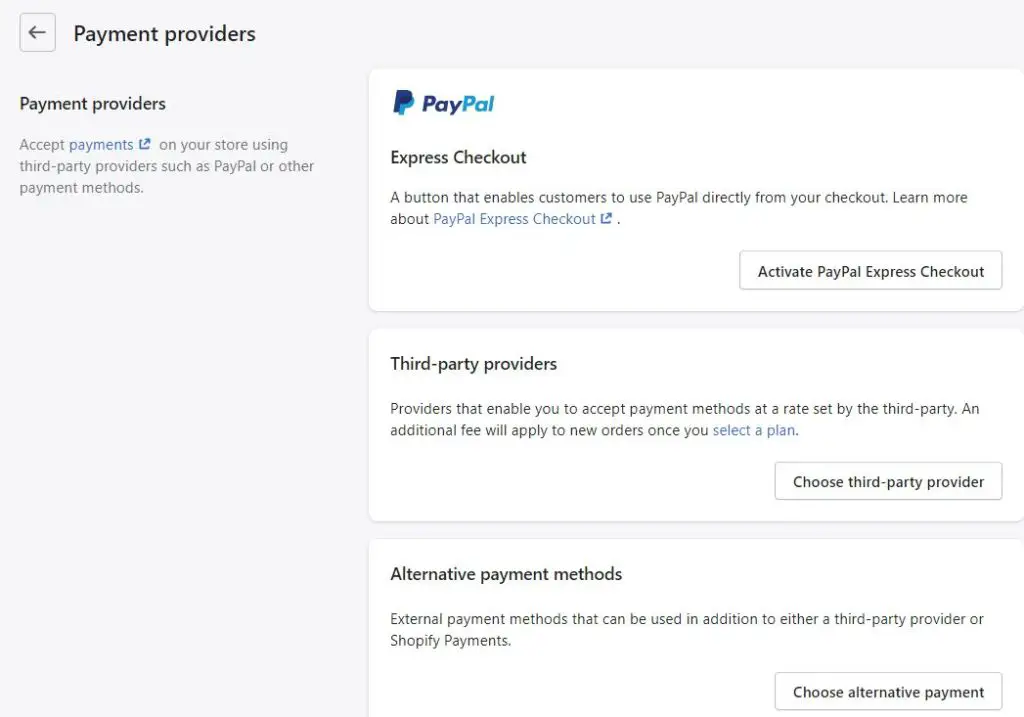
You might also need to enable alternative Shopify payment options just in case you aren’t eligible for Shopify Payments. Henceforth, you will have to act accordingly to set your payment plans up.
Checkout
The checkout tab has not got much to deal with. Everything on the checkout page should be as it is. Alternatively, you can also make customer experience worthy by pre-selecting the options.
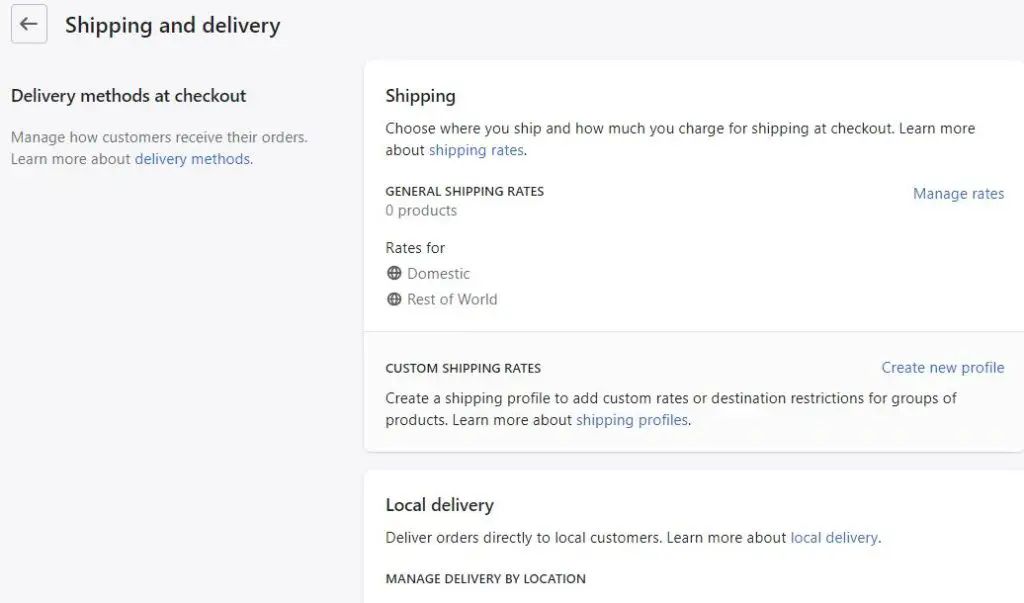
Shipping and Delivery
You can easily manage how customers receive their orders in this tab. You can set shipping rates and how much you will charge for shipping at checkout.
You can also create a shipping profile that will help you to add custom rates or destination restrictions for groups of products.
There is an option of Local delivery that is great for delivering orders directly to local customers.
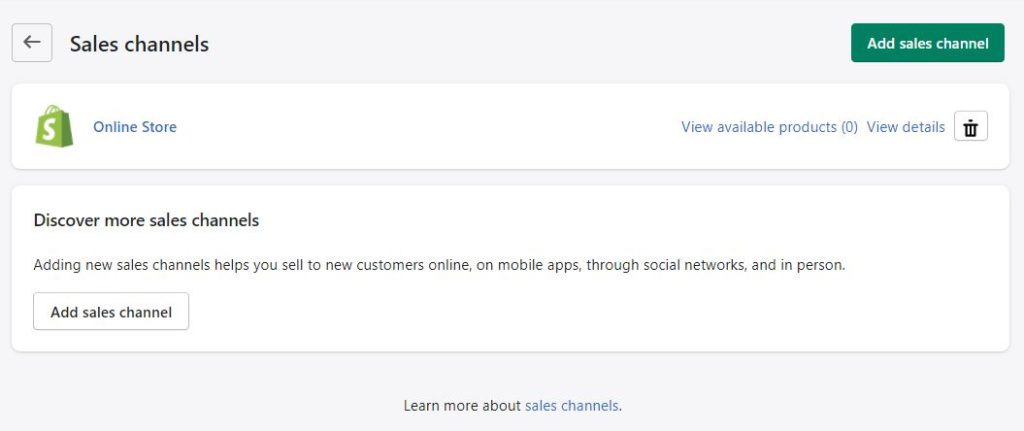
Sales Channels
Sales Channels tab in Setting will help you in adding new sales channels to enable you to sell your provides and services to new customers who are online, are on mobile apps and using social networks.
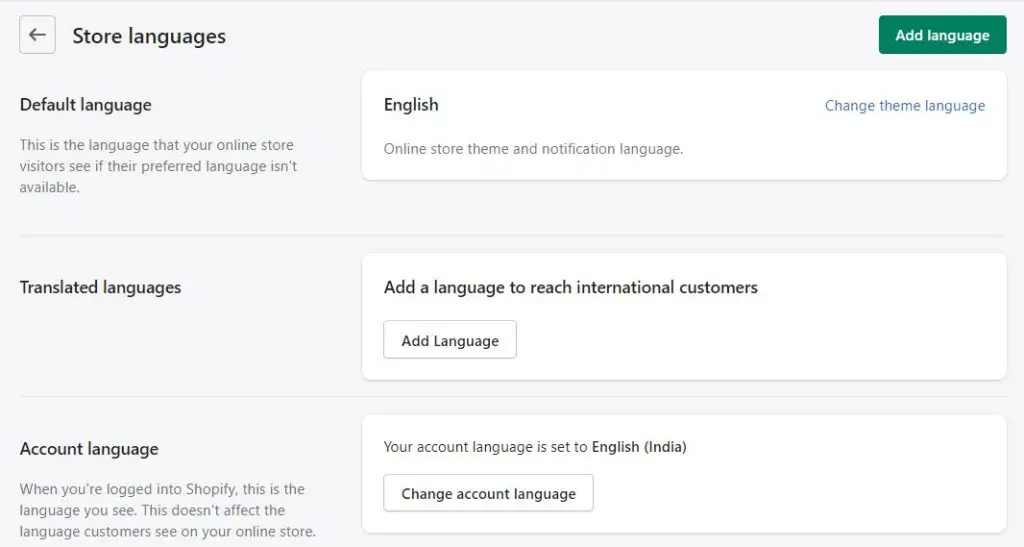
Store Languages
This tab allows you to set the language of your Shopify store. If your customers are in a country where their main language is not English, then you can use “Add Language” button to set language for them.
Step 3: Buy a Domain Address
A domain basically is a URL that links up to your website with your Shopify store. This is the URL that your customers will type when they will be looking for your website/store online.
For Shopify, users get a primary domain that is similar to the domain name that visitors are very likely to find when they navigate through your website.
If you already have a domain name, all you need to do is connect your Shopify store with the domain name.
The process to do so is very simple.
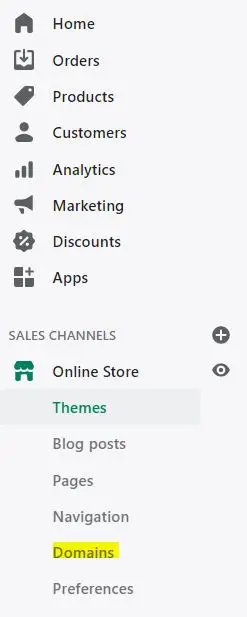
Start with clicking on the left of the dashboard that will contain the Domains tab. After successfully clicking on the Domains button, hit through to buy a new domain where you will get a chance to buy a domain name of your choice. If the domain is available, then buy the domain immediately through Shopify.
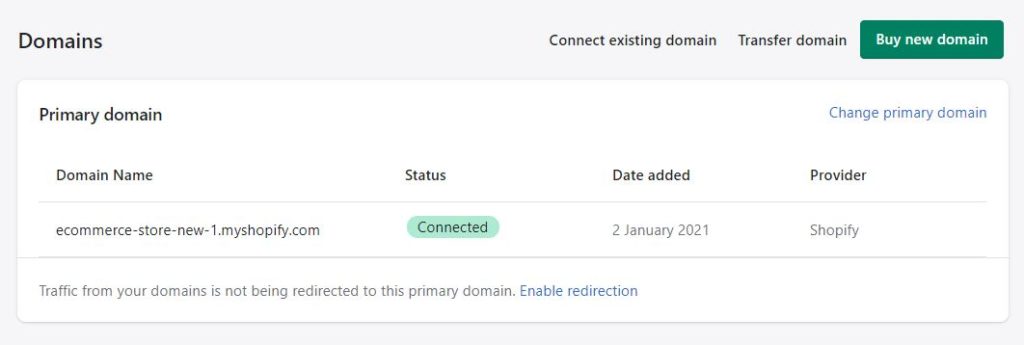
Alternatively, you can also buy your domain name from Namecheap or GoDaddy. Some of the major characteristics that you need to consider while choosing your domain name are as follows:-
- Choose something that is easy to recall and is short. It is best to choose an acronym that has 10-15 characters. This will help people to easily remember your domain name without any trouble.
- Avoid using any punctuation mark. This makes your domain name sound difficult. Therefore, to go for an easy spelled out name.
- Always remember to keep the relevant keywords in your mind while looking for a domain name. This is one of the most significant factors that people look for when looking for your online Shopify store.
Step 4: Get the Right Theme!
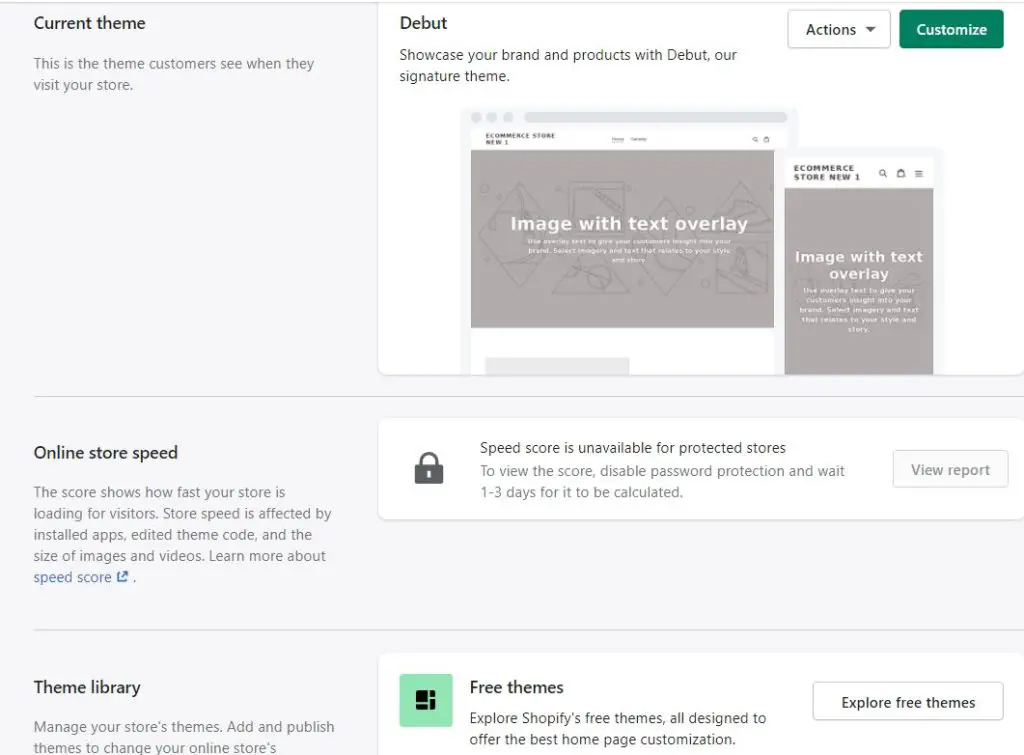
One primary reason for Shopify to be an absolute favorite for many is its ability to provide users and helping them out in customizing and creating their good looking website in a very short amount of time. If you are someone with no or zero experience in the area, then this is the way to go.
Getting your store the perfect theme is significantly important. People are going to judge your store on the basis of how it looks and is presented. A theme is the first thing that your visitor will see when they hit your Shopify store. Therefore, it is very mandatory that your Shopify store gets the theme that suits your functional aspects.
This will eventually result in creating a Shopify store for yourself that is engaging, professional, and classic at the same time.
Shopify offers the following flexibility to help you along:-
- Customize accordingly – You are totally in control of your shop. Shopify offers you the privilege to do so. There are tons of basic and highly-functional UI that will help you to create, maintain, and plan your Shopify store from scratch,
- Pre-designed Theme – There are Shopify free as well as paid theme structures for users to choose from. Shopify Themes are a great place to make your wise pick out of the lot.
Disclaimer alert though, you will be across with a dilemma when you will be choosing the themes for your store. The tough choice that you would be making will ask you to select between saving your money by opting for a free theme or investing in a design that is superior to any other themes.
If you are economical, it is completely fine. However, a premium choice will offer a great chance for you to make your Shopify store stand out. The tons of features and functionalities will help in accommodating the needful customizations.
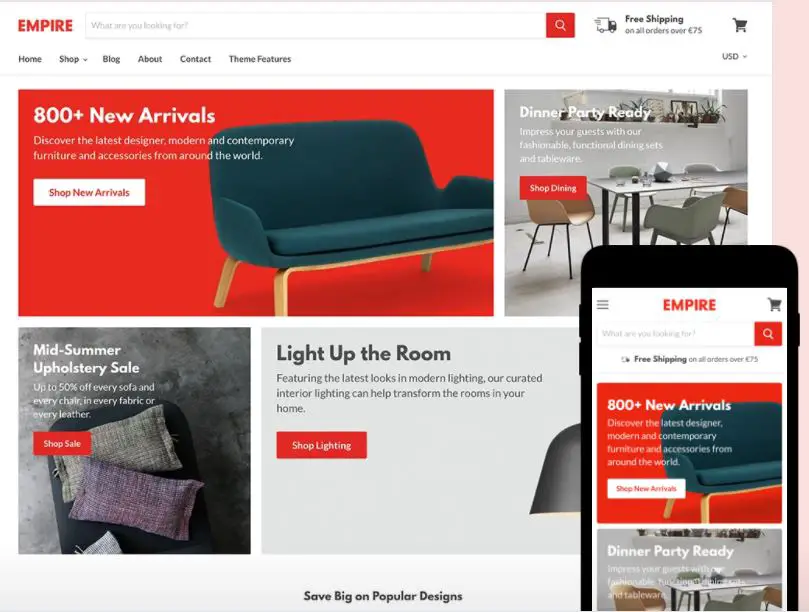
- One thing that you sure need to consider would be accessing your theme-based store on your mobile devices and desktops. This will give users a chance to adjust the images and texts accordingly when you view them on a mobile device. A responsive Shopify store is extremely important for a flawless shopping experience.
Customizing your theme
Click on the ‘Customize’ button as shown below. This will redirect you to the customization dashboard which will allow you to make changes as you want them in your Shopify store.
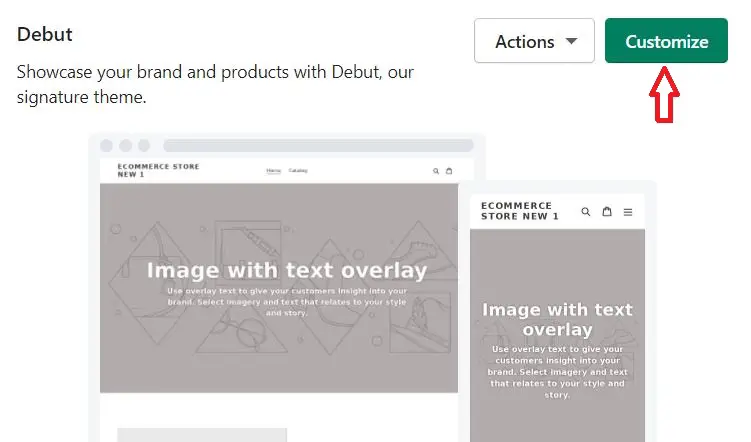
The different sections that you will see on the left-hand side of the dashboard will tell you ways of customizing your page. The footer and header will remain as they are and will be configured in the same manner for all the website pages.

Therefore, we are here designing the webpage of your Shopify store and different sections of the page as well. Additionally, you can also add or remove any sections that you don’t want on your page. It is best to have a homepage that is simple, structured, and well-managed.
Undoubtedly, it is a suggestion that you can intake and experiment with your website’s homepage. Along with the global settings, you can also adjust your front end with different colors, fonts, and so on. The best advice here would be to select the perfect color that would go with your Shopify store and then base all your adjustments according to the primary color that you picked.
You can do whatever you think deems fit for your website. You can do a whole lot of extravaganza that will help in enhancing the website.
Step 5: Important Adjustments of Pages
Now that you have successfully made the customization adjustments, it is high time that you configure different pages that are a requirement for your website. Some of the important pages you should create are Terms of Use, FAQs, About Us, Privacy Policy, Refunds Policy, etc.
So in order to manage and configure the pages, visit your online Shopify store right from the dashboard and then hit ‘Pages’.
Further, click on ‘Pages’ followed by ‘Add Page’. Once ‘Add Page’ is clicked successfully, you will find a page like below.
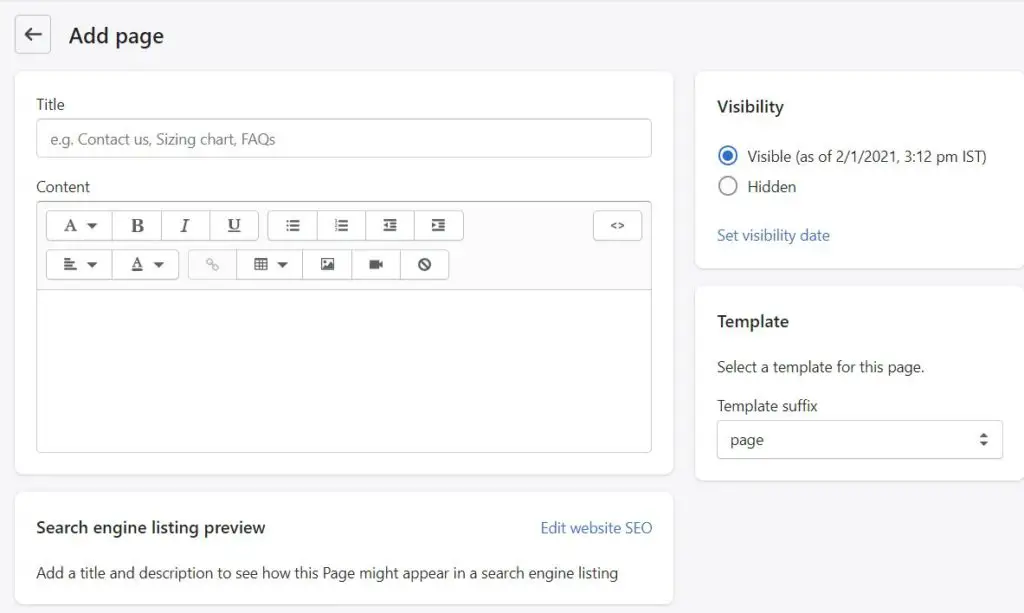
Similar to the above, you can choose the different pages and their names and manage the content data accordingly. For your information, Shopify also has many ready-made templates for the mentioned pages that will make it easy to directly select the template. You can create Refund Policy and Privacy Policy pages.
Go to Website Settings > click on Legal Tab.
After successfully clicking on it, you will see something like below.
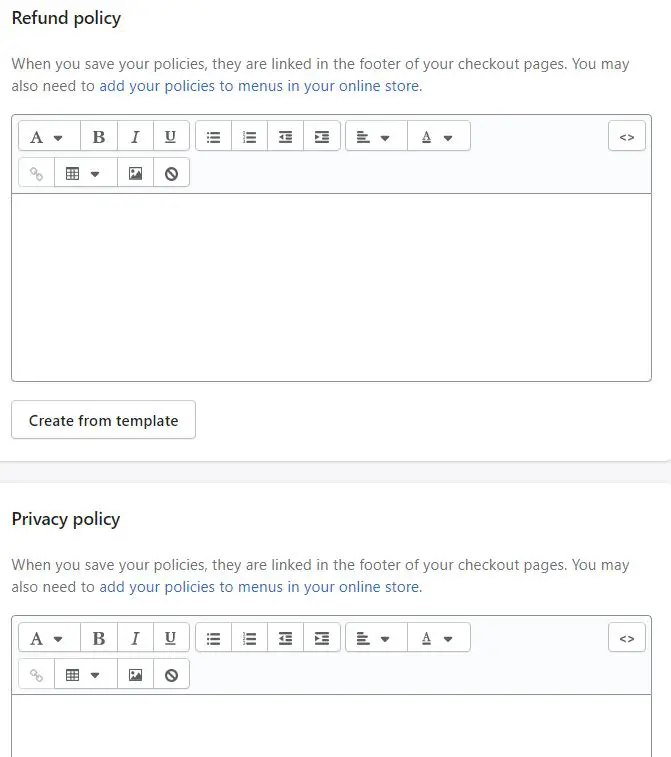
Here you have to click on ‘Create from template’ and Shopify will do the rest for you. A custom made Privacy Policy page will come up right in front of you with all the details.
After you are done with creating all the different pages for your store, you have to make them visible for the customers/buyers who visit your website. You can duplicate the above process to settle all the different pages for your website.
Once you are done configuring all the pages. You can check all these pages on the footer section of the page.
Step 6: Get a Legit Logo
The logo has a major role to play in enhancing your online store, branding, and trust us when we say this, and it is essential that you believe and understand the significance of your logo.
For visitors, the first thing to consider would be to check on a logo that makes your business look authentic. A logo puts a belief on the visitors proving the authenticity of your website.
There are tons of resources to choose from when you are planning to design your logo on your own. The benefit of these custom made logos would be to style your logo in a way you wish to. Also, one thing that you need to remember is to keep everything simple and to the point.
The logo that you will select will help your website to draw attention and positive comments. Well, be ready for negative feedback also if the logo is not doing justice to your website.
Step 7: Adding Products
Hoping you have now got yourself a Shopify store that is sleek, authentic, and well-designed, the time we focus on things that really matter. Your Shopify store will be known for the products you telecast and show off. After all, there can’t be an online store with no product to feature, isn’t it?
This step will require a lot of effort and time. However, it will need a lot of dedication and complete dedication in the process. Your products are responsible and are a primary reason that will help in gathering the revenue for your Shopify store.
Getting potential customers is most significant and hence, it would require curated products otherwise it will be difficult to attract customers towards your store.
Go to ‘Admin Panel’, click on ‘Products’ which will help to manage the inventory. Therein you have the following options.
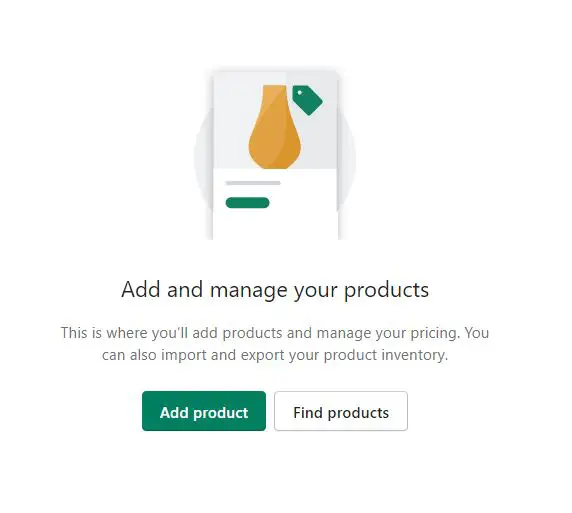
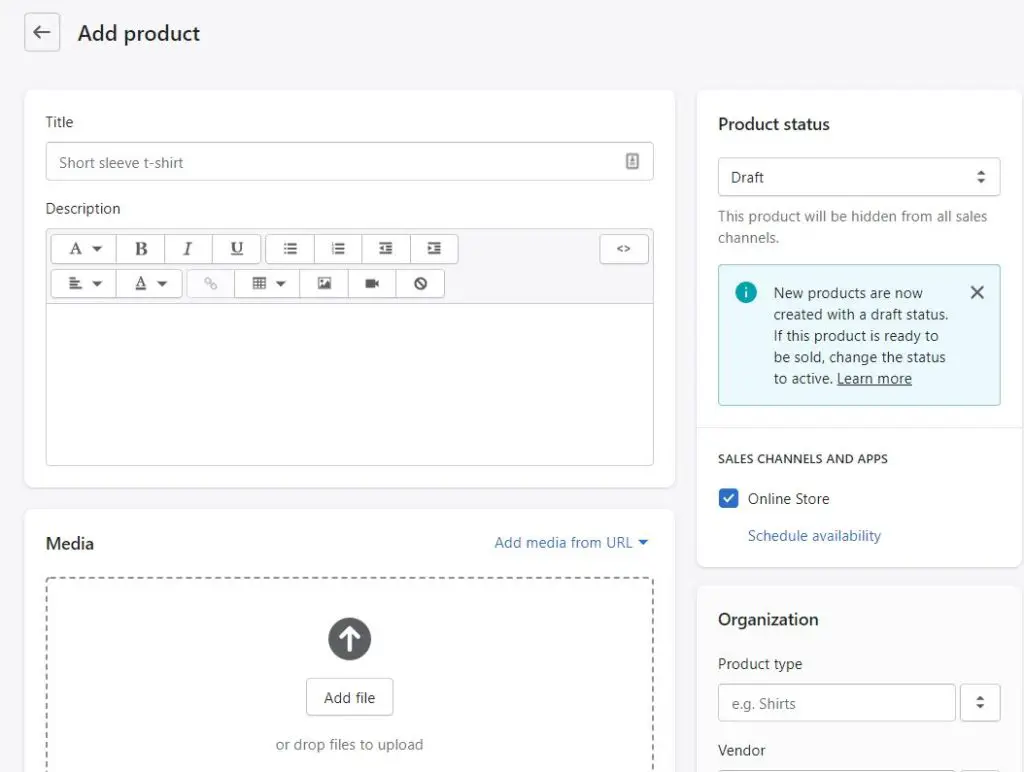
- Add a product manually: Well, when you are starting off, it is obvious that you have fewer products in general. If the total number of products that you have is less than five, you are not likely to go through a lot of trouble while manually adding them.
For each product you add, you will need to add all the details like details for the product, type, etc. Manually you can also add the images for your items.
- Use CSV File: Having an inventory is obvious when you are planning to launch your own Shopify store. Directly importing CSV files is a great idea. Also, make sure that the CSV file should contain all the details for the listings or products.
Step 8: Add these Apps
It is indeed important that your Shopify store has the required functionality. To ensure that, there are a couple of apps that you need to add to your store for better functioning of your store. Some of the functionalities include customer reviews and discounts.
Some of the apps that we are mentioning are completely free but on the contrary, for some, you will have to pay. The highly recommended and suggested apps are as follows: –
1. Oberlo
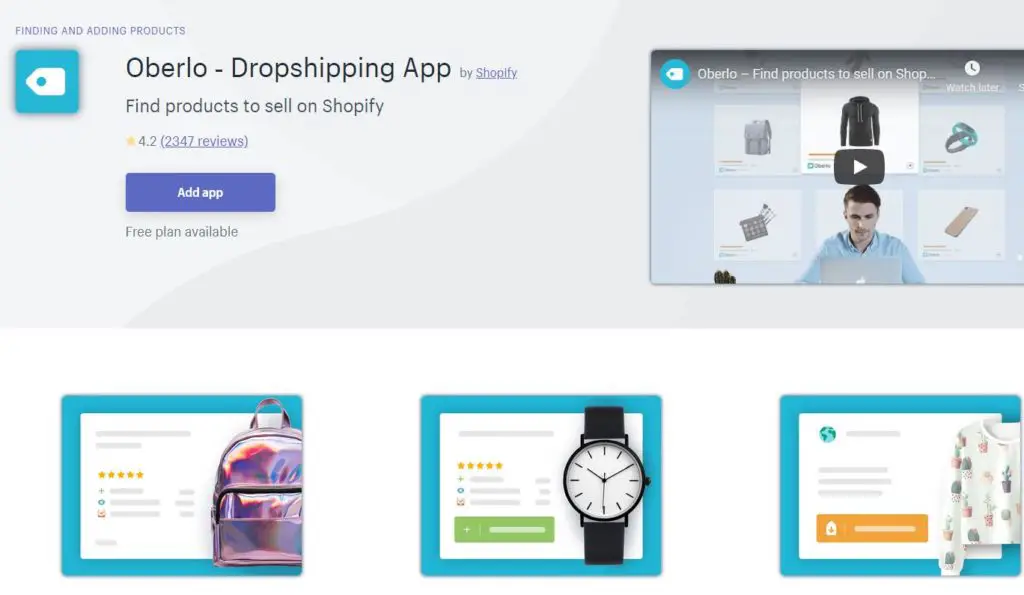
Oberlo is completely free of cost to embed in your Shopify store. If you have high-end plans like dropshipping from different websites like AliExpress, the Oberlo app will help you get the right products directly from the tagged merchant.
Also, if a customer orders anything from your store, it will also notify the vendor about it. This will, without a speck of doubt, save a lot of time and effort.
Link to Download: https://apps.shopify.com/oberlo
2. Sumo
Sumo also is a completely free to use tool which also counts as an affordable option. However, if you opt for the premium version you will need to pay $49/month.
The agenda of the tool is to help users in collecting and monetizing email subscribers. The Sumo tool has been the best for the following reasons: –
(i). Reduces the number of abandoned carts.
(ii). Tail your list of emails.
(iii). Increase the average value of every order.
Link to Download: https://apps.shopify.com/sumome
3. Crush Pics
This is a paid app which will need you to pay $5-$20/month depending on the number of images you choose. Well, with websites, loading is a great deal and indeed important. This goes without saying for e-commerce websites as well. Images count as the primary contributor to the slowness or loading issues for a website.
Crush Pics is a tool that will offer you images that are compressed automatically while you put them on upload. Speed your site and save your time and effort by getting yourself Crush Pics.
Link to Download: https://apps.shopify.com/crush-pics
4. YOTPO
YOTPO is free if you place 50 orders in a month. Customer reviews have a major role to play when you expect new visitors to visit your store. With YOTPO, it becomes significantly easier to have great reviews on your Shopify store.
Link to Download: https://apps.shopify.com/yotpo-social-reviews
You are all set to Sell
Shopify store continues to be at the top of the e-commerce business because of multiple reasons. There are many platforms that have come up today offering the same features and advantages to its users but Shopify continues to be on the top.
It only requires a couple of hours to set up your online store and therein you can continue your options to amplify the management of the store.
Shopify has been on top for tons of entrepreneurs and has helped them see significant growth in a very short time. With the right strategy, this can easily be achieved and hence, can help you set the milestone to an undefined momentum.
Opening a Shopify Store? Know About The Costs!
Well, by now certainly you have made a choice to get started with the e-commerce business, right? Then most definitely you have figured out all the odds of survival too. E-commerce is a fast-growing industry and one of the huge ones making a rise in the present world.
Different e-commerce trends, however, helps in adjoining different shoppers from all over the world. Further, they also plan to put forward a plan for customers that is easily accessible to them, have reasonable prices, and orders are just a click away. Also, as a seller, nothing gets better than this for you either.
Cost for Opening a Shopify store!
There are lots of factors on which your budget depends on size, scale, etc. The budget depends on all these factors for you as you follow a B2C business-standard.
The different plans for pricing on Shopify vary from Basic, Regular, and Advanced.
Being a seller, you get the option that works best for you. Here is the figurative plan that will help you in deciding better.
Shopify Basic Plan
The below image will provide you with how much you would need to pay depending on the service you opt for.
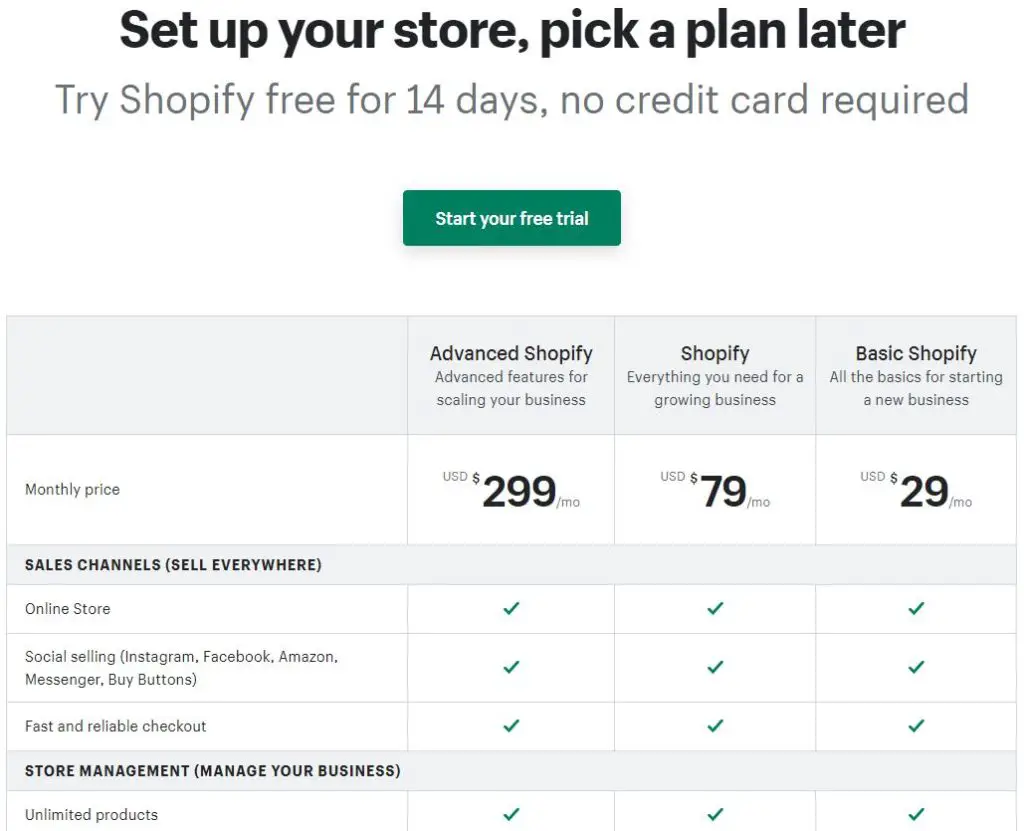
The Basic Plan is for $29/month. Under this, your Shopify store is best optimized and is given a fully-operational store. In addition to these, you also get an e-commerce website and a blog. Using social media to link all the products that you are willing to sell on the platform is a great idea.
That is not all. You also get customer support for 24 x 7 and some exclusive discount rates on shipping. What gets better than this for a basic plan?
Additional charges of 2.9% will apply when credit card transactions are made to purchase the basic plan.
Shopify Regular Plan
The Shopify Regular plan just gets better with its offers and benefits. It keeps the seller’s perspective into consideration. Starting from attractive percentages to support, it also provides an add-on to help you save on accidental costs.
For the regular Shopify plan, you will have to invest $79/month. It encloses all the benefits that you get on the basic plan as well. Furthermore, customers get a chance to buy gift cards online from the service thus adding a lot to extending the business.
Shopify support will also take care of your needs round the clock if you need them. Additional charges of 2.5% will apply when credit card transactions are made to purchase the regular plan.
Advanced Shopify Plan
Opting for an Advanced Shopify plan is the best if you think your business is seeing growth and is expanding in the right way. Therefore, these expansions definitely need accommodating the growth and hence, the advanced plan helps you do the needful.
The amount that you have to pay for an advanced plan would be $299/month. It is compatible, comprehensive, and a suitable approach for every other seller looking forward to making their business stand out of the lot. This plan embeds all the advantages of basic and regular Shopify plans.
Along with these, the advanced plan also fetches you 10 staff accounts which help to increase the bandwidth chipping at no extra cost at all. Shopify advanced is an exclusive option that will help you in building reports with the help of different dynamics of your sales figure. These reports will help in making an analysis of the selling and performances that your Shopify store will welcome in the coming time.
Final Words
Well, the article pretty much deals with the entire process of how you can set your business profile in the right manner.
If you are starting from scratch, there isn’t a lot to worry about, as this ultimate guide will help you in successfully setting up the Shopify store of your dreams. However, it might get a little difficult a couple of times but always remember to work hard to achieve what you have planned for.
Definitely, opening up a brand-new Shopify store requires a lot of management, plan, and study, but Shopify is worth all the trouble. Once you are successful in understanding the basics of how Shopify works, it is going to be a piece of cake for you.
Have a happy experience if you are looking forward to starting your e-commerce business platform in the coming time. Learn about other best ecommerce platforms that will also help you to start selling online.
