Are you tired of constantly scrolling through the endless options in your right-click menu? Do you wish you could streamline it and only have the tools and options you actually use at your fingertips?
Well, you’re in luck! In this blog post, we’re going to show you how to customize the right-click menu in Windows 11 to your heart’s desire.
By the end of it, you’ll have a sleek and efficient right-click menu that will make your life so much easier. So let’s dive in!
Accessing the right-click menu
Okay, so the first step in customizing your right-click menu is actually accessing it. It’s super easy, don’t worry! All you have to do is:
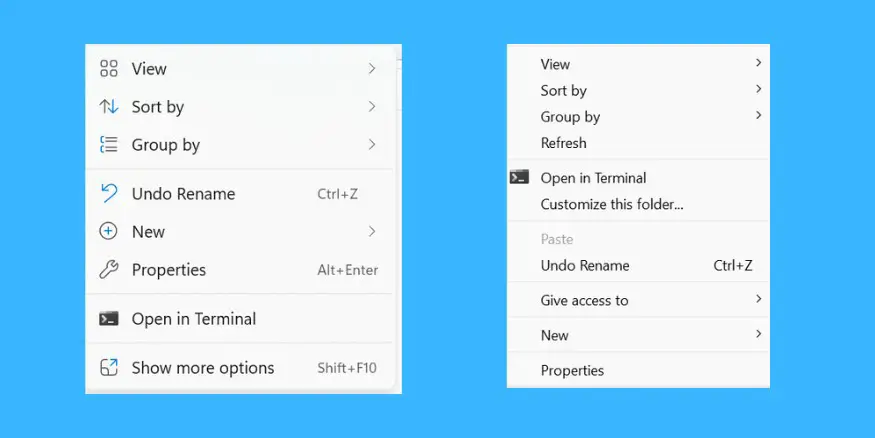
- Right-click on your desktop background or an empty space in your Start menu.
- A list of options will appear – this is your right-click menu!
See, that wasn’t too hard, right? Now that you know how to access the right-click menu, you’re ready to start customizing it to your liking. We’ll go over that in the next section, so keep reading!
Customizing the right-click menu
Alright, now for the fun part – customizing your right-click menu!
There are a few different ways you can go about this, so we’ll cover both the built-in options and some third-party tools that can make the process even easier.
First up, let’s talk about adding and removing items from the right-click menu using the built-in options in Windows 11. To do this:
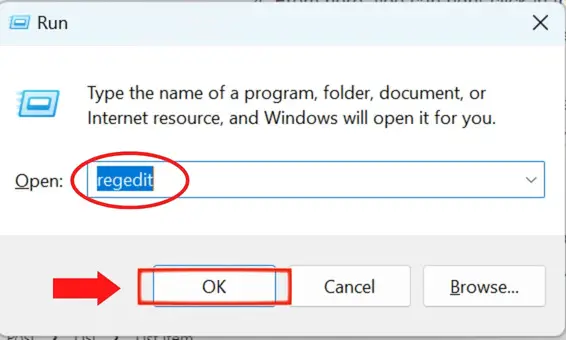
1.Press the Windows key + R to open the Run dialog box.
2.Type “regedit” into the box and press Enter.
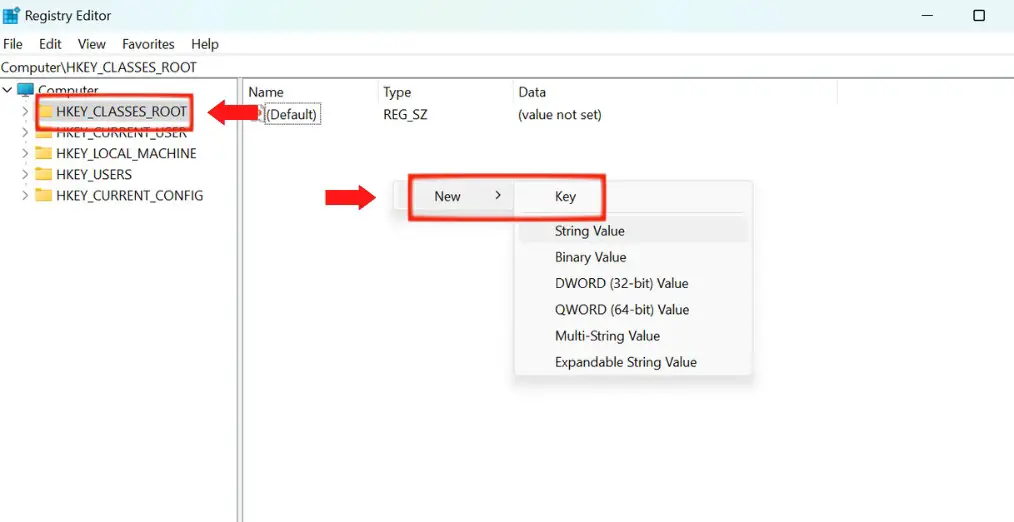
3.Navigate to the following key: HKEY_CLASSES_ROOT*\shell
4.From here, you can right-click in the right pane and select “New” to add a new item to the menu, or right-click on an existing item and select “Delete” to remove it.
Keep in mind that you’ll need to be careful when making changes in the Registry Editor, as it can have a big impact on your system if you delete or modify the wrong thing. It’s always a good idea to back up your registry before making any changes.
If you want an easier and safer way to customize your right-click menu, you can also use a third-party tool like Right-Click Extender or Context Menu Editor.
These tools allow you to easily add and remove items from the menu without digging into the Registry. Just download the tool, install it, and follow the prompts to customize your menu to your liking. It’s that simple!
So there you have it – two different ways to customize your right-click menu in Windows 11.
Whether you want to go the built-in route or use a third-party tool, you now have the knowledge and power to streamline your menu and make it work for you.
Tips and considerations
Now that you know how to customize your right-click menu in Windows 11, there are a few things to keep in mind to make sure you get the most out of your customized menu.
First, consider which items you actually use on a regular basis. There’s no point in cluttering up your menu with a bunch of options you never use. Be selective and only keep the items that are truly important to you.
Next, think about the organization of your menu. Can you group similar items together to make it easier to find what you’re looking for?
Or maybe you could rearrange the items so the most frequently used ones are at the top of the list. A little bit of organization can go a long way in making your menu more efficient.
Finally, keep in mind that customizing your right-click menu does come with some risks. As mentioned earlier, making changes in the Registry Editor can have unintended consequences if you’re not careful.
And using third-party tools can also introduce security risks, as you’re downloading and installing software from an outside source.
Make sure to only use reputable tools and be mindful of the changes you’re making to avoid any issues.
Overall, customizing your right-click menu in Windows 11 can be a great way to streamline your workflow and make your computer more efficient.
Just be sure to consider these tips and risks as you make your changes, and you’ll be on your way to a super-customized menu in no time!
Conclusion
Well, there you have it – a comprehensive guide to customizing your right-click menu in Windows 11! We hope you found this post helpful and are excited to give it a try yourself.
Just remember to be careful when making changes in the Registry or using third-party tools, and to consider which items you actually use and how you can best organize them.
The benefits of customizing your right-click menu are endless – you’ll save time by not having to scroll through a bunch of unnecessary options, and you’ll have all your most frequently used tools and options right at your fingertips.
So why wait? Go give it a try and see how much smoother your workflow can be with a customized right-click menu. Happy customizing!


