Hey there! Are you ready to take your Android experience to the next level? Well, buckle up because I’m about to show you how to enable developer options and unlock a whole new world of possibilities on your device.
First off, let’s talk about what developer options are. Essentially, they’re a set of advanced settings that are built into every Android device.
These options give you more control over your device and allow you to tweak settings and perform tasks that aren’t available in the regular settings menu.
So, why might you want to enable developer options? There are a ton of reasons! For one, it allows you to do things like enable USB debugging, which can be super helpful when you’re trying to connect your phone to your computer for things like rooting or installing custom ROMs.
You can also use developer options to improve performance, like forcing your device to use the GPU for rendering, or to see how your device is performing with features like “show touches” or “show CPU usage”.
Additionally, you can use developer options to run apps on the Android Emulator, which can be useful for developers or testers.
In short, developer options are a powerful tool that can help you customize your Android experience and get the most out of your device. So, are you ready to dive in and start exploring? Let’s get started!
Enabling Developer Options on Android
Alright folks, are you ready to start unlocking the full potential of your Android device? In this section, I’m going to walk you through the process of enabling developer options step-by-step. It’s super easy, so don’t be intimidated!
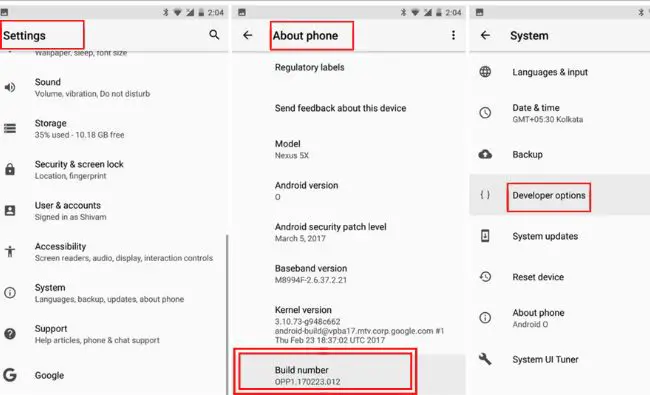
Step 1: Go to the settings menu. This is usually found by pulling down the notification shade and tapping on the gear icon, but it can vary depending on your device.
Step 2: Scroll down to the “About phone” or “System” section. This is where you’ll find information about your device, like the model number and Android version.
Step 3: Tap on “Build number” multiple times. You’ll see a message saying “You are now X steps away from being a developer.” Keep tapping until it says “You are now a developer!”
Step 4: A message will appear indicating that developer options have been enabled. You can now access these advanced settings by going back to the main settings menu and scrolling down to the bottom.
And that’s it! You’ve now unlocked the full potential of your Android device. Now you can start experimenting with different settings and features to customize your experience.
As always, if you have any questions or run into any issues, feel free to reach out and I’ll be happy to help. Happy tweaking!
Using Developer Options
Alright folks, you’ve enabled developer options on your Android device, now it’s time to start exploring all the cool things you can do with them!
In this section, I’ll be talking about some of the most useful features and settings that are available and give you some tips for using them safely.
USB debugging:
This feature allows you to connect your device to your computer and use tools like ADB (Android Debug Bridge) to perform a variety of tasks, like installing custom ROMs or taking screenshots.
To enable USB debugging, go to developer options and look for the option labeled “USB debugging.” Once you’ve enabled it, you’ll be able to connect your device to your computer and use ADB.
Force GPU rendering:
This feature forces your device to use the GPU (graphics processing unit) instead of the CPU (central processing unit) for rendering.
This can lead to a noticeable improvement in performance, especially when using apps that are heavy on graphics. To enable it, go to developer options and look for the option labeled “Force GPU rendering.”
Show touches:
This feature displays a small dot on the screen wherever you touch it, which can be helpful for recording videos or taking screenshots of your device.
To enable it, go to developer options and look for the option labeled “Show touches.”
Running apps on the Android Emulator:
This feature is particularly useful for developers or testers, as it allows them to test apps on a variety of different devices and configurations.
To enable it, go to developer options and look for the option labeled “Running apps on the Android Emulator.”
Don’t keep activities:
This feature closes all running apps when you navigate away from them, rather than keeping them open in the background.
This can help improve performance and save battery life, but it can also cause apps to reload more often, which can be inconvenient.
Limit background processes:
This feature limits the number of apps that can run in the background. This can also help improve performance and save battery life, but it can also cause apps to behave differently than expected.
Mock locations:
This feature allows you to set a fake location for your device. This can be useful for testing apps that use location services or for hiding your real location.
OEM unlocking:
This feature allows you to unlock the bootloader on your device, which can be necessary for installing a custom ROM or rooting your device.
Strict mode:
This feature enables strict mode, which can help you identify performance issues in your apps by detecting disk and network accesses.
Now that you know about some of the most useful features and settings that are available, let me give you some tips for using them safely.
First and foremost, be careful when making changes in developer options. Some settings can cause your device to malfunction or even brick if used improperly.
Make sure to read up on any setting you’re not familiar with before making changes.
Additionally, be sure to keep your device updated to the latest software version. This will ensure that you have the latest security updates and fixes, which can help protect your device from vulnerabilities or other issues.
Lastly, It’s also a good idea to make sure you have a backup of your device’s data before you start making changes in developer options. That way, you can restore your device if something goes wrong.
Developer options are a powerful tool that can help you customize your Android experience and get the most out of your device.
Just be sure to use them safely, and you’ll be able to enjoy all the benefits they have to offer. Happy tweaking!
Conclusion
And there you have it, a complete guide to enabling and using developer options on Android!
I hope you’ve found this information helpful and that you’re now able to take full advantage of all the cool features and settings that developer options have to offer.
In summary, developer options are a powerful tool that can help you customize your Android experience, improve performance, and access advanced features.
Whether you’re a developer, a power user, or just someone who wants to get more out of their device, developer options are definitely worth exploring.
However, it’s important to remember that developer options can be dangerous if used improperly. Be sure to use caution when making changes and read up on any settings you’re not familiar with before making changes.
Additionally, make sure your device is updated to the latest software version and always have a backup of your device’s data before you start making changes in developer options.
In conclusion, developer options can be a valuable tool to help you get the most out of your device, but make sure to use them safely.