Have you ever wanted to keep certain photos private on your Google Photos? Well, now you can with the new locked folder feature!
A locked folder in Google Photos is a special kind of folder that allows you to store and organize photos that you don’t want everyone to see.
It’s a great way to keep personal photos, sensitive information, or anything else you want to keep private, all in one convenient place.
With this feature, you can breathe easy knowing that your private photos are protected and secure.
So, let’s dive in and take a closer look at this game-changing feature and how you can set it up for yourself!
Setting up a locked folder
Alright, now that you know what a locked folder in Google Photos is and why it’s so awesome, let’s dive into the nitty-gritty of how to set one up for yourself!
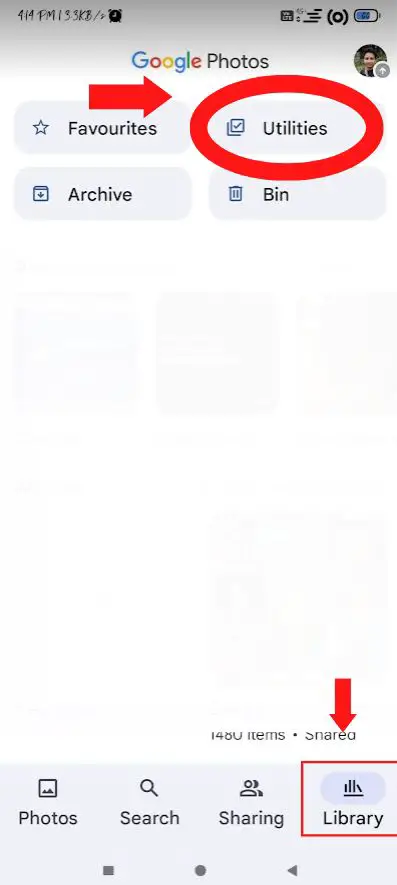
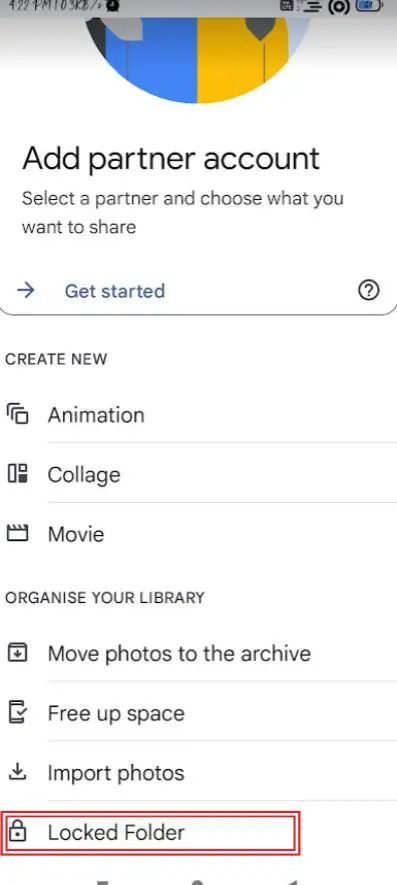
First things first, open up the Google Photos app on your device. Next, select the Library tab and then select the Utilities tile.
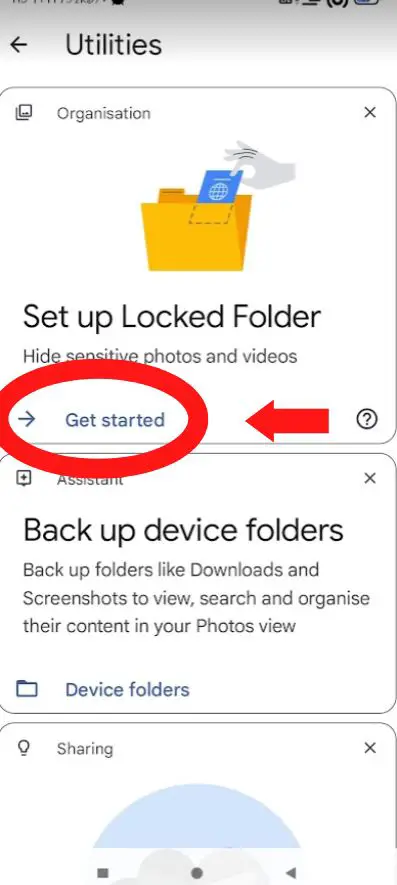
From there, you’ll see the option to “Set up locked folder.” Give your new locked folder a name and set a password (or use your fingerprint or facial recognition for added security).
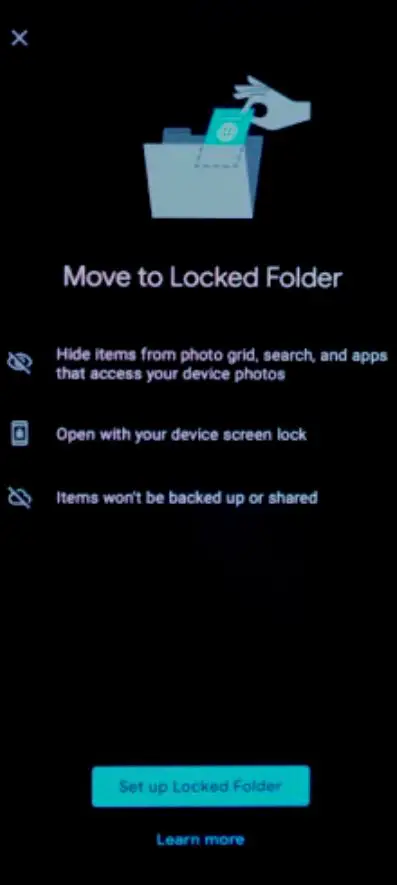
Now that your locked folder is set up, it’s time to start adding photos to it! To add photos to your locked folder, simply select the photos you want to add and then tap on the three dots in the top right corner of the screen.
From there, you’ll see the option to “Move to locked folder.” Select that option, and your photos will be safely stored in your new locked folder.
It’s that simple! With just a few taps, you can now keep your private photos secure and organized in one convenient place.
And don’t worry, you can always add or remove photos from your locked folder as needed. So, go ahead and give it a try and see how it can change the way you use Google Photos!
Accessing a locked folder
Alright, now that you’ve got your locked folder set up and filled with all your precious photos, you might be wondering how to actually access and manage those photos. Well, have no fear because it’s super easy!
To view the photos in your locked folder, simply open up the Google Photos app, tap on Library and then Utilities”
From there, you’ll see your locked folder listed. Tap on it and enter your password (or use your fingerprint or facial recognition) to access your photos.
Once you’re inside your locked folder, you can easily manage your photos just like you would with any other photos in your Google Photos library.
You can move them to different folders, delete them, or even share them with specific people. To share a photo from your locked folder, simply select the photo and tap on the share icon.
Then, choose the “Add people” option and enter the email addresses of the people you want to share the photo with. Keep in mind that they will also need to enter a password to access the photo.
So, there you have it! With the locked folder feature in Google Photos, you can keep your private photos safe and secure while still being able to easily view and manage them.
And even share them with specific people. So go ahead and give it a try, you won’t regret it!
Additional features
We’ve been talking about the incredible new locked folder feature in Google Photos, and now it’s time to dive into some of the extra features that make it even more awesome!
First up, we have the password protection feature. Not only can you set a password for your locked folder when you first create it, but you can also change or update your password at any time.
This means that if you ever feel like your password has been compromised, you can easily change it to keep your photos extra secure.
And if you’re worried about forgetting your password, don’t worry! Google Photos allows you to reset your password using your registered email address.
And that’s not all! Another great feature is the Touch ID/Face ID integration.
This means that instead of having to type in a password every time you want to access your locked folder, you can simply use your fingerprint or facial recognition to unlock it.
This makes accessing your private photos even faster and more convenient.
All in all, the locked folder feature in Google Photos is packed with extra features that make it an even more powerful tool for keeping your private photos safe and secure.
So, go ahead and give it a try and see how it can change the way you use Google Photos!
Conclusion
Well, that’s it! We’ve talked about everything there is to know about the new locked folder feature in Google Photos.
To recap, locked folders in Google Photos allow you to keep certain photos private and secure, making it easy to protect sensitive information, personal photos and other things you don’t want everyone to see.
Setting up a locked folder is a breeze and managing your photos inside the folder is just like managing any other photos in your Google Photos library. You can even share photos from a locked folder with specific people.
Additionally, you can use password protection and Touch ID/Face ID integration to make accessing your locked folder faster and more convenient.
All in all, the locked folder feature in Google Photos is a powerful tool that can change the way you use the app. It’s an easy and secure way to keep your private photos protected.
So, go ahead and give it a try, you’ll be glad you did! Trust me, it’s a game-changer!