Are you tired of constantly having to retype or re-create the same information over and over again in Microsoft Office?
Well, have no fear because today we’re going to be talking about one of the most useful tools in the Microsoft Office suite: the clipboard.
The clipboard is a feature that allows you to easily copy and paste information within and between different Office applications.
It’s a lifesaver for anyone who frequently works with large amounts of data or needs to transfer information from one document to another.
But the clipboard isn’t just a time-saver, it’s also an essential tool for increasing productivity and streamlining your workflow.
With the clipboard, you can quickly and easily move text, images, and other content between Office applications, allowing you to work more efficiently and effectively.
In this blog post, we’re going to dive deep into the world of the clipboard and show you how to access and use it in Microsoft Office.
We’ll also share some tips and tricks to help you make the most of this powerful tool. So, whether you’re a seasoned Office pro or just getting started, keep reading to learn how to unlock the full potential of the clipboard.
Accessing the clipboard in Microsoft Office
Now that you understand the importance of the clipboard in Microsoft Office, let’s dive into the nitty-gritty of how to access it.
Accessing the clipboard is a breeze, and once you know how to do it, you’ll wonder how you ever lived without it.
First up, let’s take a look at how to access the clipboard in Word:
- Open the “Home” tab in Word.
2. Look for the “Clipboard” group and click on the “Clipboard” button.
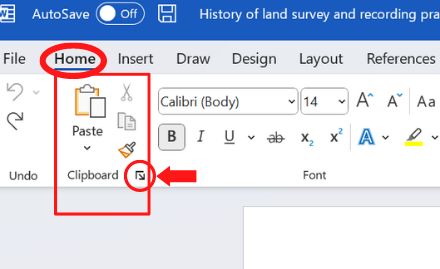
3. A panel will appear on the right side of the screen with all of the items currently on your clipboard.
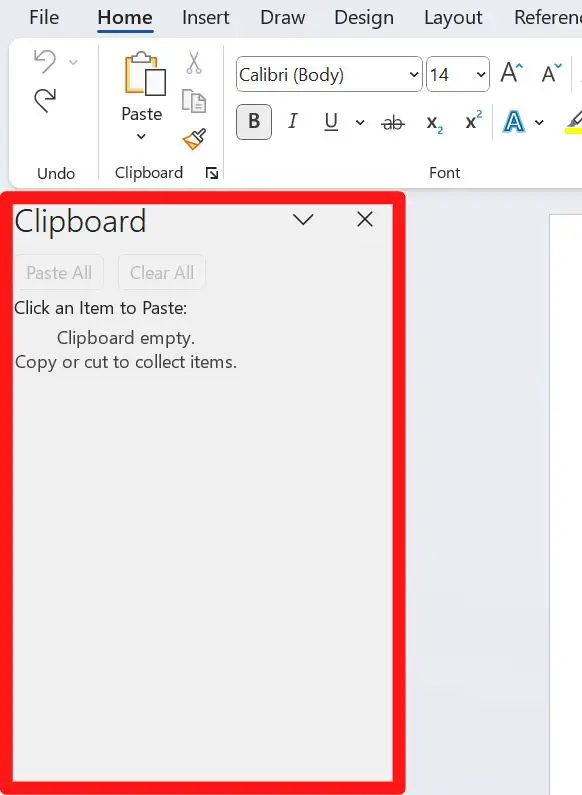
4. To paste an item, simply click on it.
Next, let’s move on to Excel:
- Open the “Home” tab in Excel.
- Look for the “Clipboard” group and click on the “Clipboard” button.
- A panel will appear on the right side of the screen with all of the items currently on your clipboard.
- To paste an item, simply click on it.
Finally, let’s take a look at PowerPoint:
- Open the “Home” tab in PowerPoint.
- Look for the “Clipboard” group and click on the “Clipboard” button.
- A panel will appear on the right side of the screen with all of the items currently on your clipboard.
- To paste an item, simply click on it.
As you can see, the process for accessing the clipboard in Word, Excel, and PowerPoint is virtually identical. Once you’ve done it in one application, you’ll have no trouble doing it in the others.
And with these step-by-step instructions and screenshots, you’ll be a clipboard pro in no time!
Using the clipboard in Microsoft Office
Now that you know how to access the clipboard in Microsoft Office, it’s time to put it to work!
The clipboard is incredibly versatile and can be used to copy and paste all sorts of content, including text, images, and even entire sections of a document.
Let’s start with the basics: copying and pasting text. To copy text, simply highlight the text you want to copy and press “Ctrl+C” on your keyboard.
You can then navigate to the location where you want to paste the text and press “Ctrl+V”. The text will be pasted in its new location.
But the clipboard isn’t just for text. You can also use it to copy and paste images and other types of content. To copy an image, right-click on it and select “Copy”.
You can then navigate to the location where you want to paste the image and right-click again, this time selecting “Paste”.
Here are a few tips to help you use the clipboard more efficiently and effectively:
- Use the “Ctrl+Z” shortcut to undo a paste if you accidentally paste something in the wrong location.
- Use the “Ctrl+C” shortcut to copy multiple items at once. Each time you press “Ctrl+C”, the current selection is added to the clipboard, allowing you to copy multiple items without having to paste in between.
- Use the “Ctrl+Shift+V” shortcut to paste text without formatting. This is useful if you’re pasting text from a source with a different formatting style.
The clipboard is a game changer, and once you start using it, you’ll wonder how you ever worked without it. It’s the ultimate time saver and productivity booster, so don’t hesitate to start using it today!
Additional Tips and Tricks:
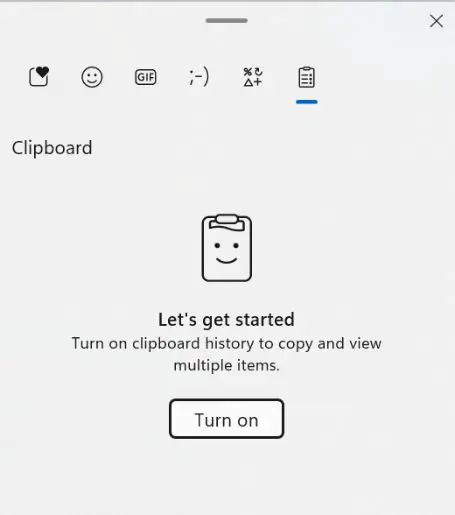
- To clear the clipboard in Windows press “Windows+V” , this will bring up the clipboard history and you can click on the Clear all button.
- To increase the clipboard history capacity in Windows you can change the settings in the clipboard settings, go to “Settings > System > Clipboard” and change the number of items shown in clipboard history.
- Use a third-party clipboard manager app like Ditto or Paste to keep a history of all your copied items, so you can easily access them later.
- Use keyboard shortcuts like “Ctrl+Shift+C” to copy and “Ctrl+Shift+V” to paste when working with multiple items to keep your clipboard organized.
- Use the Office clipboard to copy and paste between Office apps.
Conclusion
We’ve covered a lot of ground in this blog post, from the basics of what the clipboard is and how to access it in Microsoft Office, to advanced tips and tricks for using it more efficiently and effectively.
In summary, the clipboard is a powerful tool that allows you to easily copy and paste information within and between different Office applications.
With the help of the clipboard, you can quickly and easily move text, images, and other content between Office applications, allowing you to work more efficiently and effectively.
We hope you enjoyed this blog post and that you now have a better understanding of the clipboard and how to use it in Microsoft Office. Remember, the clipboard is your friend, so don’t be afraid to use it! Happy clipping!