Are you tired of looking at the same old icons on your desktop and in your files? Do you want to give your computer a personal touch and make it feel more like your own? Then you’ll love today’s tutorial on customizing icons in Windows!
Icons are the little graphics that represent your files and folders on your computer. They’re what you click on to open up your documents, photos, and programs.
While they might seem like a small detail, changing them up can really spruce up your desktop and help you stay organized. Plus, it’s just plain fun to play around with different icons and see how they look on your screen.
In this post, we’ll go through all the steps you need to customize your icons in Windows.
We’ll show you how to change the icons for individual files and folders, how to customize the icons for shortcut files, and even how to restore the default icons if you decide you want to go back.
So let’s get started and give your computer a fresh new look!
Preparing to customize icons
Before we dive into the nitty-gritty of customizing icons, there are a couple things you’ll need to have in place. First and foremost, you’ll need to have administrator privileges on your computer.
This means that you’ll either need to be the main user of the computer or have the password for the administrator account. Without administrator privileges, you won’t be able to make any changes to your icons.
The second thing you’ll need is the icons you want to use. You can either choose from the default icons that come with Windows, or you can use your own custom icons.
If you want to use your own icons, you’ll need to have them saved on your computer. You can find lots of great icons online, or you can create your own using a graphics program like Photoshop or GIMP.
Just make sure to save them as .ico files, which is the file type that Windows uses for icons.
Now that we have everything we need, let’s move on to changing those icons!
Changing icons for individual files and folders
Alright, let’s get down to business! Changing the icons for individual files and folders is actually really easy once you know how to do it. Here’s a step-by-step guide to help you out:
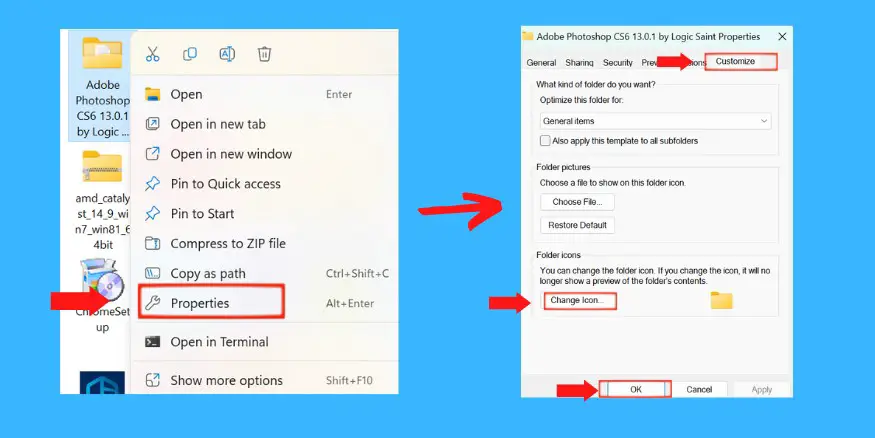
- Right-click on the file or folder whose icon you want to change. A menu will appear.
- From the menu, select “Properties.” This will open up a new window with a bunch of options.
- In the Properties window, look for a tab that says “Customize.” Click on it to open it up.
- Under the Customize tab, you should see a button that says “Change Icon.” Click on this button to open up the Change Icon window.
- In the Change Icon window, you’ll see a list of available icons. You can scroll through this list and select an icon by clicking on it. If you want to use a custom icon that you’ve saved on your computer, you can click the “Browse” button and navigate to the .ico file.
- Once you’ve selected the icon you want to use, click the “Ok” button to apply the changes.
- Finally, go back to your desktop or folder and take a look at the new icon. It should be the one you selected! If it’s not, you may need to refresh the folder or desktop to see the changes.
And that’s all there is to it! It’s a pretty straightforward process, and before you know it you’ll have a bunch of fun new icons adorning your files and folders.
If you run into any trouble along the way, don’t hesitate to leave a comment or reach out for help. Happy icon-customizing!
Changing icons for shortcut files
Great job on customizing the icons for your regular files and folders! Now let’s move on to shortcut files, which are essentially links to other files or programs on your computer.
Shortcut files can be really useful for organizing your desktop and quick access to your favorite programs.
And the best part is, you can customize the icons for your shortcut files just like you did for your regular files and folders. Here’s how:
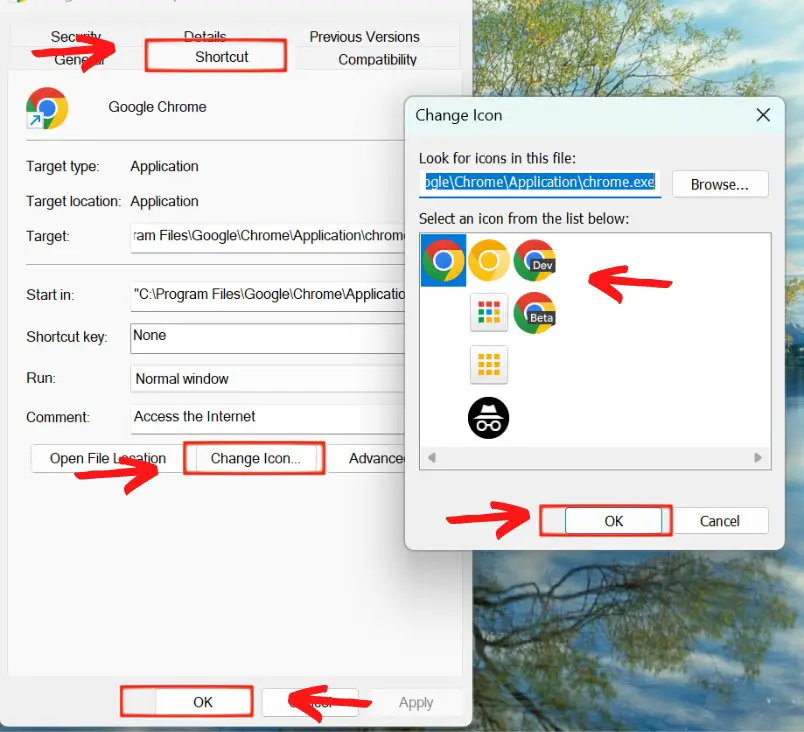
- Right-click on the shortcut file whose icon you want to change. A menu will appear.
- From the menu, select “Properties.” This will open up a new window with a bunch of options.
- In the Properties window, look for a tab that says “Shortcut.” Click on it to open it up.
- Under the Shortcut tab, you should see a button that says “Change Icon.” Click on this button to open up the Change Icon window.
- In the Change Icon window, you’ll see a list of available icons. You can scroll through this list and select an icon by clicking on it. If you want to use a custom icon that you’ve saved on your computer, you can click the “Browse” button and navigate to the .ico file.
- Once you’ve selected the icon you want to use, click the “Ok” button to apply the changes.
- Finally, go back to your desktop or folder and take a look at the new icon for your shortcut file. It should be the one you selected! If it’s not, you may need to refresh the folder or desktop to see the changes.
And that’s it! You now know how to customize the icons for your shortcut files. With a little bit of creativity, you can use these customized shortcut icons to create a visually appealing and organized desktop.
Have fun experimenting with different icons and finding the perfect look for your shortcuts!
Restoring default icons
So you’ve had a blast customizing your icons and giving your desktop a fresh new look. But sometimes, you might want to go back to the default icons for your files and folders.
Maybe you’re tired of the custom icons you chose, or maybe you just want to start from scratch and try a different set of icons. Whatever the reason, it’s easy to restore the default icons in Windows. Here’s how:
- Right-click on the file or folder whose icon you want to restore to the default. A menu will appear.
- From the menu, select “Properties.” This will open up a new window with a bunch of options.
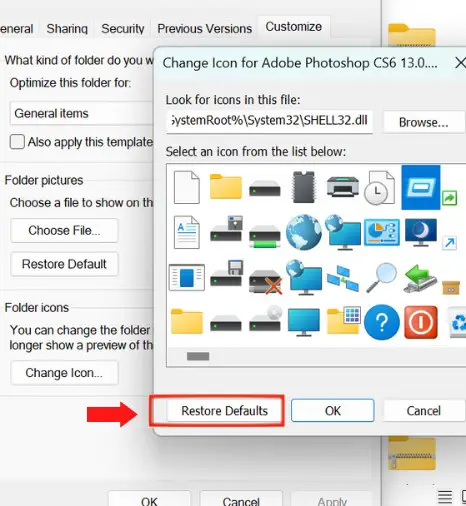
- In the Properties window, look for a tab that says “Customize.” Click on it to open it up.
- Under the Customize tab, you should see a button that says “Reset.” Click on this button to restore the default icon.
- The default icon should now be applied to the file or folder. Go back to your desktop or folder and take a look to confirm that the icon has been successfully changed.
And that’s all there is to it! Restoring default icons is just as easy as customizing them. Keep in mind that this process only works for files and folders, not shortcut files.
If you want to restore the default icons for your shortcut files, you’ll need to delete the shortcut and create a new one.
I hope this tutorial has been helpful and that you now feel confident in your ability to customize and restore icons in Windows. Happy icon-tinkering!
Conclusion
And there you have it! You now know everything you need to know about customizing icons in Windows.
Whether you want to give your desktop a fresh new look or just want to make your files and folders more organized and visually appealing, customizing icons is a quick and easy way to do it.
To summarize, here are the steps for customizing icons:
- Right-click on the file or folder whose icon you want to change.
- Select “Properties” from the menu.
- Under the “Customize” tab, click the “Change Icon” button.
- Choose an icon from the list or browse for a custom icon on your computer.
- Click “Ok” to apply the changes.
For shortcut files, the process is pretty much the same, except that you’ll need to go to the “Shortcut” tab instead of the “Customize” tab. And to restore default icons, just go to the “Customize” tab and click the “Reset” button.
There are so many creative ways that you can use customized icons to personalize your desktop and organize your files.
You can create a visually appealing theme with matching icons, or you can use different icons to help you quickly identify different types of files. The possibilities are endless!
So don’t be afraid to experiment with different icons and find a look that works for you. And if you run into any trouble along the way, just refer back to this tutorial for guidance. Happy icon-customizing!
